When managing returns in Shopify, restocking items correctly is key to keeping your inventory accurate and avoiding overselling. Here's a quick guide:
- Enable Inventory Tracking: Ensure the "Track quantity" option is active for all products. Without it, returned items can't be restocked.
- Inspect Returns: Check the condition of returned items - only restock items that are like-new or suitable for resale.
- Update Inventory: Restock items during the refund process by selecting the "Restock" box, or manually adjust inventory through the Shopify admin.
- Handle Unsellable Items: Mark damaged or unsellable products as unavailable and decide whether to recycle, donate, or remove them from inventory.
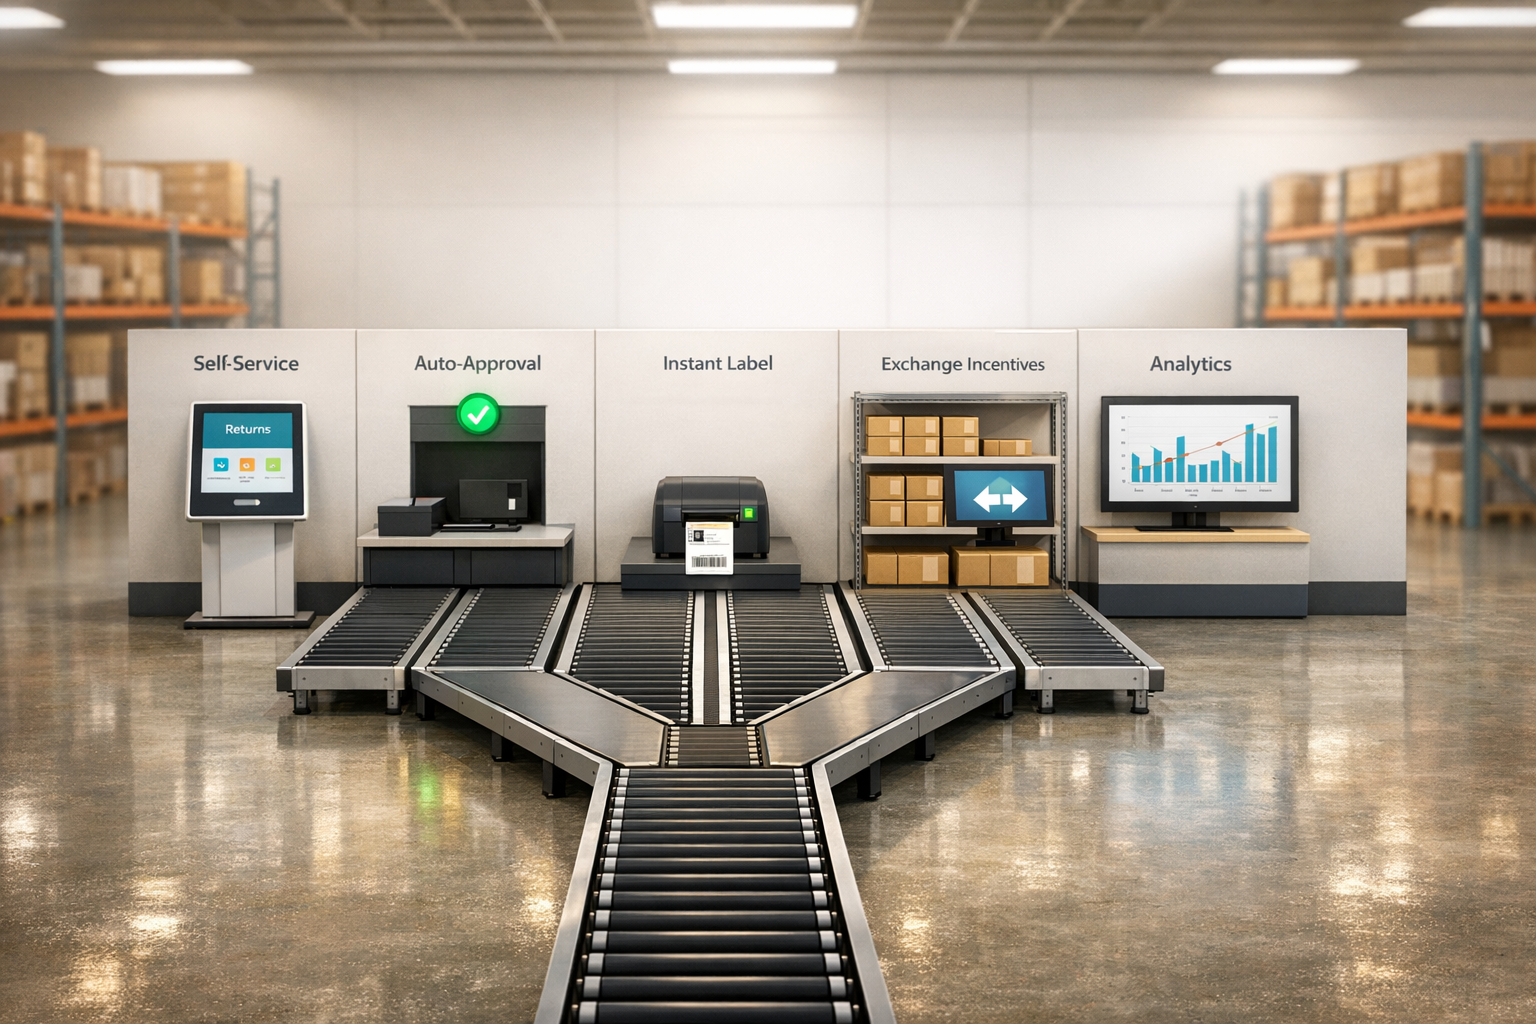
- Automate with Tools: Use apps like Forthroute to streamline returns, automate approvals, and sync inventory updates.
Proper restocking not only ensures inventory accuracy but also impacts customer satisfaction and repeat business.
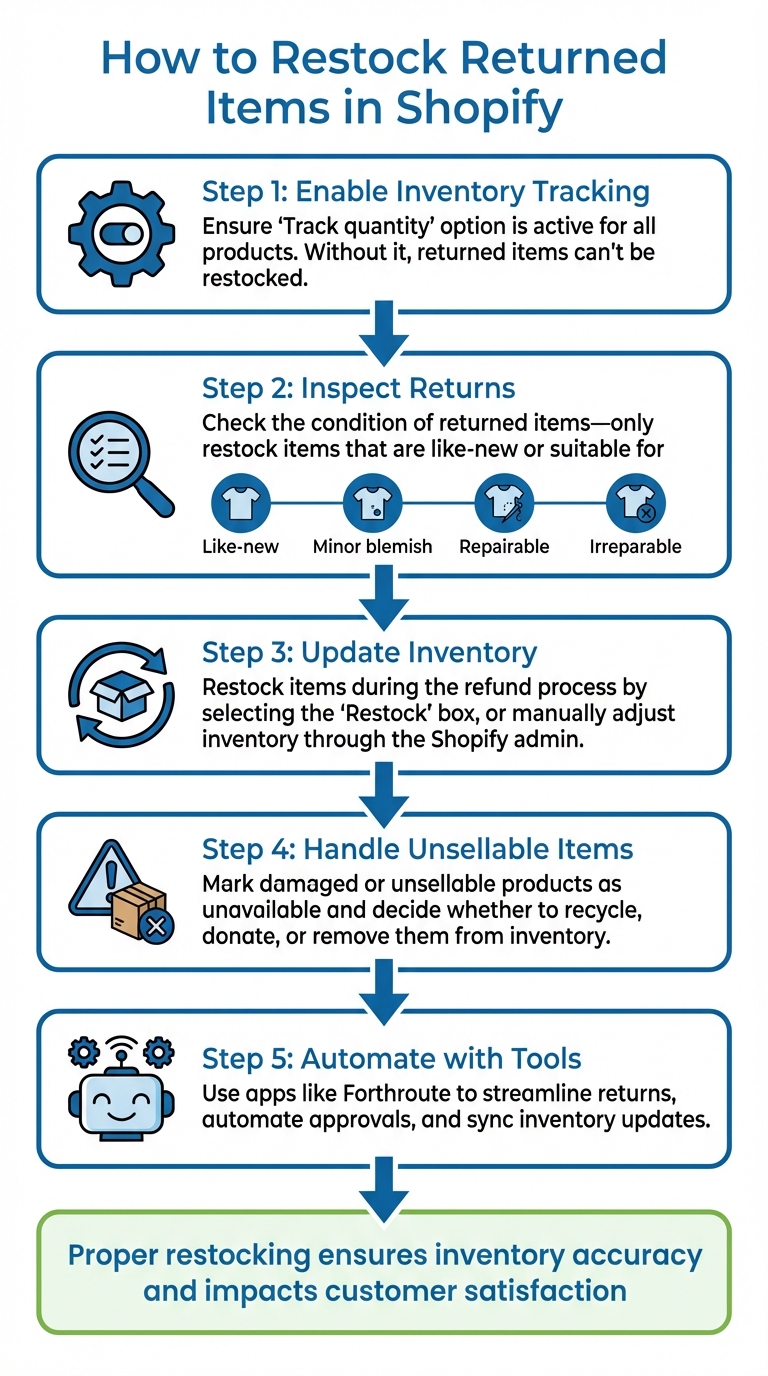
5-Step Process for Restocking Returned Items in Shopify
How to Handle Returns for Shopify Stores on SKUSavvy

What You Need Before Restocking
Before diving into restocking, make sure your Shopify store is properly set up. Without enabling inventory tracking or having clear return policies in place, you risk delays that can disrupt the entire process.
Review Your Return Policies and Product Conditions
Start by reviewing your return policies to define which items are eligible for return and under what conditions. For example, implementing a 30-day return window can help you avoid dealing with unsellable items that linger in your inventory.
Be specific about exclusions, especially for items related to health or safety. For instance, you might decide to only restock unopened products. Keep in mind that Shopify POS doesn’t support restocking for bundles, so make sure to outline these limitations clearly.
Additionally, establish clear policies for refunds, exchanges, or store credit. This avoids the hassle of making manual decisions on a case-by-case basis during returns. Tools like Forthroute can help streamline this process by automating return approvals. For example, you can set rules to automatically approve returns under $50 or reject items marked as final sale, saving your support team time and effort.
Once your return policies are squared away, it’s time to verify your Shopify settings.
Access Your Shopify Admin and Inventory Tools
After setting clear return guidelines, double-check your Shopify configuration to ensure everything is ready for restocking.
Log into your Shopify Admin, navigate to the Products section, and confirm that "Track quantity" is enabled for all items you plan to restock. Without this setting active, Shopify won’t allow you to add those items back into inventory.
Next, check your restocking locations by going to Settings > Locations. Make sure each location’s currency matches your store’s default currency. Shopify uses these defined locations to determine where inventory is restocked. By default, items are added back to the location from which they were originally fulfilled. For in-person returns handled through Shopify POS, your staff can use the "Restock at this location" toggle to ensure inventory is updated accurately.
Inspecting Returned Items
Once your inventory setup is in place, inspecting returned items promptly is crucial for maintaining accuracy. The moment a return arrives at your warehouse or store, it should go through an immediate quality check. This step helps determine whether the item can be resold, discounted, or removed from inventory altogether. Evaluating the resale potential of each product ensures the restocking process is handled correctly.
Check If the Product Can Be Resold
Returned items generally fall into one of four categories: Like‑new, Minor blemish, Repairable, or Irreparable. To classify an item as "like‑new", it must be unopened, unused, and in perfect packaging, making it eligible for restocking at full price.
For items with minor cosmetic flaws, consider offering them at a discount (15%–30%) in a clearance section. If a product has a functional issue, weigh the cost of repairs against its resale value to decide if refurbishment is worth pursuing. However, some items - like personal care products, cosmetics, or perishables - should never be resold due to safety concerns.
"It's best to see returns as a mini quality‑control process. As soon as a return comes back, you should inspect and sort by condition."
- Kudosi‑Carlos, Merchant
Document Problems with Returns
Once you've determined the item's resale status, document any issues in Shopify. Use the platform to log defects by selecting a return reason and adding notes (e.g., "minor scratch on corner"). This helps maintain accurate inventory records and provides valuable data for addressing recurring problems.
For items deemed unsellable, make sure to uncheck the "Restock" box when processing refunds. This prevents damaged goods from being added back to active inventory. If you're using Shopify POS, disable restocking for these items as well. Regularly reviewing return data can reveal patterns, such as consistent issues with specific suppliers or misleading product descriptions, allowing you to fix problems at their source.
"If it's damaged or unsellable, note that in Shopify and do not restock."
- Stanislav Chervinskiy, Ecommerce Specialist, Mipler
How to Restock Items in Shopify
Restocking in Shopify starts with confirming that returned items are in good condition and ready for resale. Once verified, update your Shopify inventory. You can restock items while processing a refund or by manually adjusting inventory. Make sure the Track quantity option is activated in Shopify admin; without it, the system won't recognize the returned item as part of your stock.
Restock Items While Processing a Refund
The simplest way to restock is during the refund process. In Shopify admin, open the order, select the returned items, and check the Restock box before finalizing the refund. By default, Shopify will restock the item at the same location it was originally fulfilled from.
If you're using Shopify POS, tap Return or Exchange and ensure the Restock at this location toggle is on. This setting, enabled by default, updates the inventory for that specific store. If the item is damaged or unsellable, turn off the toggle before completing the transaction to keep it out of your active inventory.
"If you don't enable the Track quantity option for any product, you won't be able to restock it when it gets returned."
- AfterShip Help Center
If the refund process doesn't include restocking, you can manually update inventory levels.
Manually Update Inventory Quantities
When restocking isn't handled during the refund, you can adjust inventory manually. Navigate to Products in your Shopify admin, select the product or variant, and scroll to the Inventory section. From there, update the "On hand" or "Available" count for the correct location.
For businesses with multiple locations or third-party warehouses, ensure you update the stock at the correct fulfillment center. Shopify typically restocks items to their original shipping location, but you can manually assign a different one if needed. For users relying on third-party logistics (3PL), real-time inventory updates can be automated using webhook APIs.
sbb-itb-a3e286c
Automating Restocking with Forthroute
Handling restocking manually can be a tedious process, often leading to mistakes. By automating returns, you can directly sync customer returns with your inventory system. Forthroute leverages this automation to make the returns workflow smoother and more efficient.
How Forthroute Simplifies Returns
Instead of relying on endless email threads or manual updates, Forthroute offers a branded self-service portal. Here, customers can initiate returns effortlessly. All they need to do is enter their order number, choose the items they’re returning, and instantly receive a shipping label or QR code. The setup is quick - just 5 minutes - and doesn’t require any coding skills.
Forthroute's webhook API connects your Shopify store with your warehouse or third-party logistics provider. Once a returned item is received, inspected, and ready for restocking, the warehouse sends a real-time update through the API. This ensures Shopify inventory levels adjust automatically, eliminating the need for manual data entry and keeping inventory accurate at all times.
"Connect your warehouse with our webhook API. Get real-time updates when returns are received, inspected, and restocked." - Forthroute
Set Up Auto-Approval Rules
Forthroute also offers Auto-Approval Rules, enabling you to define which returns can bypass manual review. For example, you can set rules to instantly approve low-value returns or block returns for final-sale items. Once a return meets your criteria, the system handles the rest - approving the return, sending the shipping label, and queuing the item for restocking after your warehouse confirms receipt.
This automation not only reduces the volume of support tickets but also speeds up the entire returns process. Starting at $19/month (with a 14-day free trial), Forthroute automates approvals and integrates returns seamlessly, so you only pay for the shipping labels you use.
Managing Items That Cannot Be Restocked
Once you've restocked saleable returns, it's time to handle items that can't be resold. These could include damaged goods, defective products, or items with torn packaging. Properly managing these ensures your inventory stays accurate and prevents unsellable items from accidentally re-entering your sellable stock.
Mark Items as Unsellable
For items that can't be resold, make sure to disable the "Restock at this location" toggle during the refund process. Alternatively, update their status through Products > Inventory by clicking the adjust icon next to the "Available" quantity and selecting Move to Unavailable. Shopify allows you to classify these items under categories like Damaged, Quality control, Safety stock, or Other for better organization.
If you're using the Shopify Refund API, the no_restock value ensures refunds are processed without impacting your fulfillable inventory count. This keeps your inventory data accurate and helps avoid overselling.
Always document why an item is unsellable. Use the Notes field during the return process to record specific reasons, such as "torn packaging" or "fabric stain." These notes not only create an audit trail for inventory reconciliation but also help you identify recurring issues, like a particular product frequently arriving damaged.
Once items are marked as unsellable, decide whether to recycle or donate them.
Recycle or Donate Non-Restockable Products
To remove unsellable items from your records, choose Delete from Inventory, which updates both "Unavailable" and "On hand" counts.
For automated tracking, use the reverse_fulfillment_orders/dispose webhook. This method provides a more reliable audit trail compared to manual tracking, ensuring a clear record of how non-restockable products are handled.
Reconciling Inventory After Multiple Returns
When returns start to stack up, even a single miscount can snowball into bigger discrepancies between your digital records and the actual inventory on your shelves. Regular reconciliation is key to keeping your records accurate and ensuring your stock aligns with reality. These audits also provide a chance to turn return data into actionable insights for better inventory management.
Conduct Regular Inventory Audits
First, make sure "Track quantity" is enabled for all your products. This ensures that inventory levels adjust in real time.
It's also important to distinguish between "received" and "restocked" statuses in your returns system. For example, returns marked as "received" should be moved to sellable inventory to prevent errors. If you're using Shopify's Refund API, check the restock_type field: return adds items back to your available inventory, while no_restock processes refunds without affecting stock levels.
Double-check that restocked items are sent to the correct fulfillment center.
For added accuracy, connect your warehouse management system or third-party logistics (3PL) provider via webhooks. This allows you to get real-time updates when returns are physically inspected and restocked. By reducing the time lag between when an item is returned and when it’s updated in Shopify, you can cut down on the need for frequent manual corrections.
Once your audits are accurate, you can dive into the return data to fine-tune your processes.
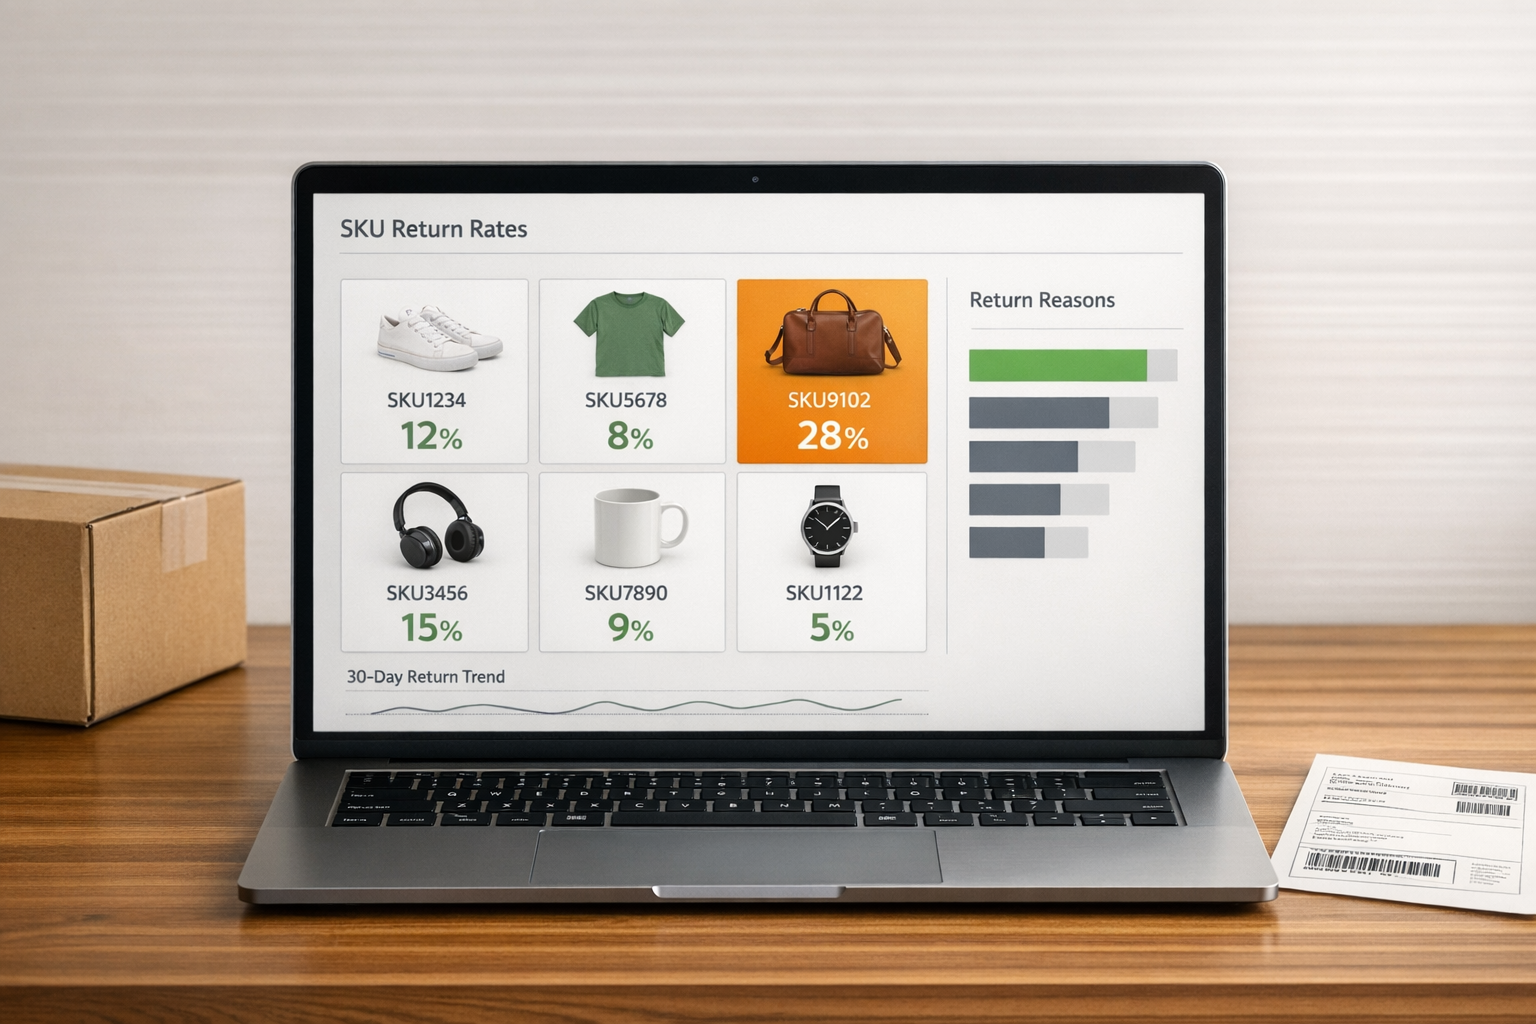
Use Return Data to Improve Your Process
Beyond just restocking returned items, regular audits and careful data analysis can help you spot patterns and address recurring issues. For instance, if you notice that a specific product has a high return rate due to damage, it could indicate a mismatch between your digital inventory and the actual condition of your stock.
Leverage return analytics to identify trends and adjust your policies automatically, reducing the chance of human error. For example, require customers to specify return reasons like "Defective" or "Size too small." This creates a clear audit trail and helps pinpoint product-specific issues. Additionally, setting defined return windows - whether 14, 30, or 90 days - helps you maintain a predictable cycle for inventory fluctuations.
To streamline things further, enable auto-restocking so inventory updates instantly when a return is approved. Tools like Forthroute’s automated approval rules can handle this process from start to finish, ensuring inventory levels are updated without the need for manual intervention. This aligns perfectly with the automation strategies discussed earlier, making your workflows more efficient.
Wrapping It Up
Managing returned items in Shopify can be made much simpler by tweaking your settings, thoroughly inspecting items before restocking, and choosing the best method - whether it's during a refund or by directly updating inventory counts. When done right, this keeps your inventory accurate and your operations smooth.
Manual processes, however, can lead to mistakes. That’s where automation steps in. Forthroute, for example, automatically updates inventory as soon as a return is marked "received." By integrating with your warehouse management system using webhooks, it provides real-time updates and encourages customers to choose exchanges or store credit over refunds. This not only helps retain revenue but also eliminates manual errors and speeds up the process of getting returned items back on sale.
FAQs
How do I set up inventory tracking in Shopify?
To set up inventory tracking in Shopify, head to your Shopify admin, open the product details, and locate the Inventory section. From there, check the box labeled Track quantity and input the current stock quantity. Shopify will then automatically adjust inventory levels as items are sold or returned.
Turning on inventory tracking is key to managing stock accurately, especially when it comes to restocking returned items. It ensures your inventory reflects real-time changes, helping you keep stock levels in check and simplify return handling.
For an even smoother process, consider using tools like ForthRoute. This tool automates the returns process, updates inventory automatically, and makes post-purchase management much easier.
What should I do with items that can’t be restocked?
If an item can't be restocked because it's damaged, defective, or unsellable, it’s crucial to follow your store’s return policy carefully. For items that can still be sold, make sure to update your inventory to reflect the restock. On the other hand, items that can't be restocked should be kept separate from your inventory to prevent them from being accidentally sold.
Decide whether to dispose of, donate, or process these non-restockable items based on your store's specific guidelines. Always update your inventory system to ensure stock counts remain accurate and to avoid overselling. Keeping clear records of these items can also make future returns and inventory management much smoother.
How can automation make restocking returned items easier?
Automation takes the hassle out of restocking by minimizing manual tasks, reducing errors, and speeding up inventory updates. With automated systems in place, processes like approving returns, creating shipping labels, and updating inventory counts happen smoothly when items are received. The result? Less time spent on repetitive tasks and more efficient operations.
Tools like ForthRoute make it even easier. Merchants can set up a branded self-service portal where customers can initiate returns, print labels, or request exchanges without any hassle. On the backend, automation ensures inventory levels are updated in real time. Returned items are quickly restocked and made available for resale, keeping stock accurate and operations running smoothly. Plus, this streamlined approach enhances the customer experience by making returns and exchanges simple and efficient.